Showing posts with label 3-d. Show all posts

Friday, April 11, 2014

a home amongst the gum trees

Give me a home among the gum trees
with lots of plum trees, a sheep or two, a kangaroo
a clothes line out the back, verandah out the front
and an old rocking chair


a great aussie song
one i thought i would try and imitate via stamping, punch art and collage.
this is a 3d version i thought i would have a try at.
i used the natural composition paper as the base then added leaves die cut from dsp
house is stamped using the hardwood stamp with a roof from the hexagon embossing folder
swing is a retired stamp set called summer afternoon and cat and dog are from cool kid set
not sure it works but it was fun to make!


cheers ears

Saturday, April 5, 2014

minecraft birthday card

my son is obsessed with minecraft
so are all his friends
so it was just a matter of time before  
i was asked to make a card and a name plaque lol

 card in a box minecraft birthday card
used the square punches A LOT!!!
plus tag it set and the blast off stamp set and hexagon punch
 brick texture on grey was made using a brick embossing folder
 i dig you from tag it stamp set and arrows made using hexagon punch
 card in a box is a 6cmx6cm square size
embossing texture inked up with some basic grey ink

font for name from internet and adapted into card with some basic grey ink
creeper is done in gumball green
pick axe handle was made using the zigzag from tasteful trim die

hope the birthday boy loves it as much as the giver lolol

cheers ears

ps more minecraft party ideas here

Sunday, January 15, 2012

paper rosettes

i saw some paper rosettes in a craft mag the other day and thought to myself how easy are they really?
so hunted the www and found one i liked
i had to tweak it for my use and this is what i came up with
 get some 12 x 12 paper (i used scrap paper) and score it every inch.
this is where a scoring tool is VERY useful:>
 then cut along the paper
i tried anything from 3cm to 7cm. 
most of mine were 5cm
just make sure you cut 2 the same width :>
 stick tape at each end
you could use glue but i foudn tape was waaaay easier
 stick the two strips together end to end
 then fold on the score lines.
if you are brave or infinitely tidier than me then feel free to do the folds free hand and do away with the whole scoring part. 
the trick is to give it a squeeze every ten folds or so to really squish it all together.
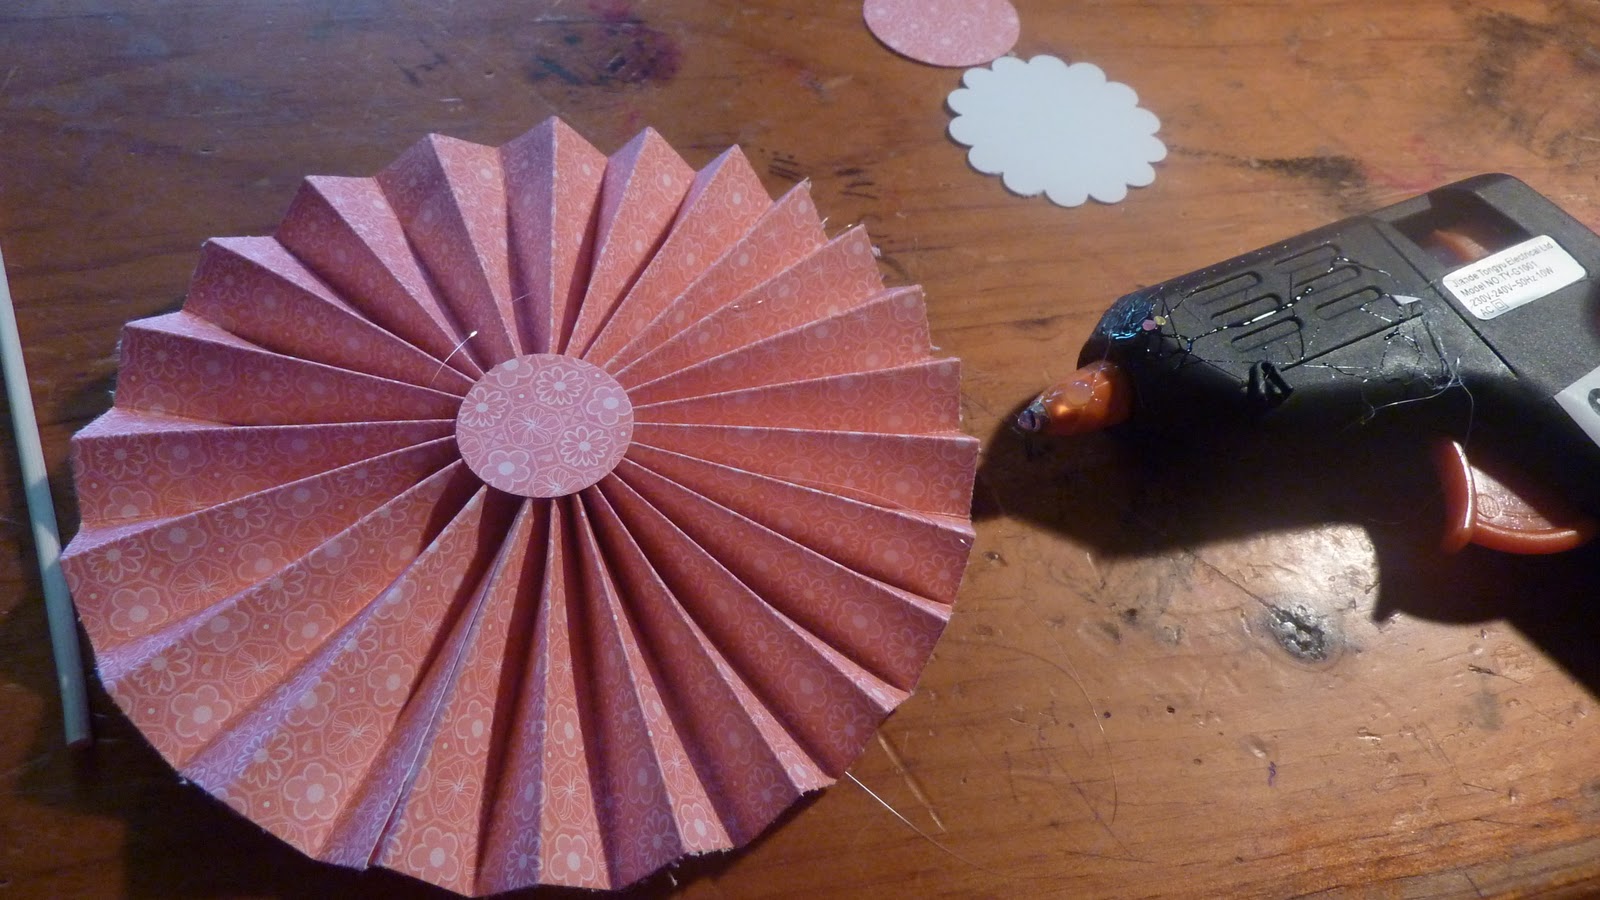
 stick the ends together to make a zig zaggy circle.
it doesn't matter what side is in the middle.
 then i punched out the bits to go in the middle from a variety of punches. i used a brad in the middle. i have also used buttons which work well (especially when i don't have the colour brad to match :>) and you just hot glue the button into place.
 now this can be the annoying part.
to get the zig zag like this all you do is push your circle into the middle and lay it flat. use all your powers of finger dexterity to stop it kapowing back out at you!!!
because it will....
..especially if some small child suddenly needs you right away to look at something very important like the poo they have done in the toilet (aahh toilet training-don't you just love it??!!)....
 to get it staying put grab your glue gun and squeeze a bit of glue in the hole in the middle and spread a little bit around the top.
put a small circle (i used a 1" circle) on top of the glue and hold it there for about 10 seconds....hopefully your fingers wont burn too much :>
fingers crossed it is stuck enough for you to quickly flip it over and glue the other side and stick a circle down there too.
then you should be ok to decorate it.
 add your middle bit with hot glue
 and ta-da!!!
it should look something like this.
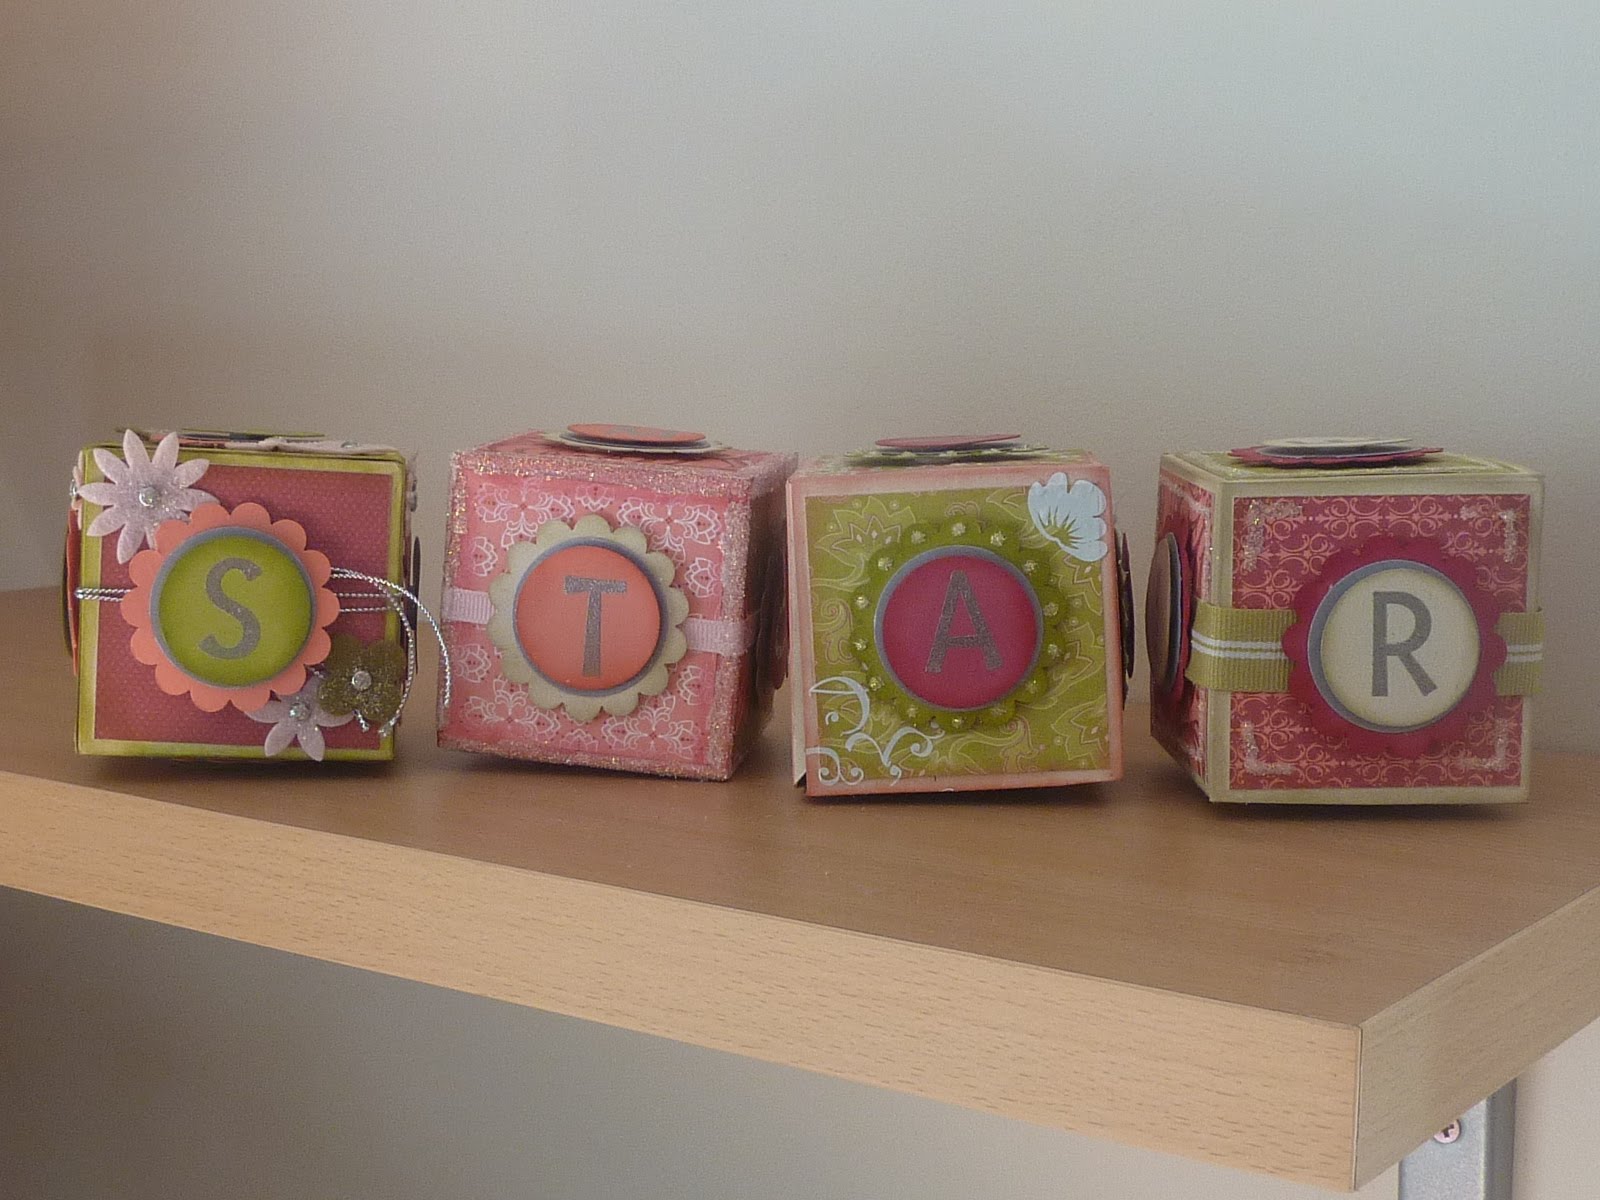
you can then add it to a scrapbook page or a card or turn into a 3-d flower or on a pennant or a wreath...a thousand zillion uses
 for the flower grab a bamboo skewer 
and poke it into the middle of the back gently
and you should end up with something like this 
 now if you wanted to be a little bit fancy
you can make your ends prettier by punching them with border punches. do this before you go and do the foldy zigzag bit. as you can see different punches make different results.
you can also sponge the edges or distress them-whatever takes your fancy really. 

here's a selection of some i have made

hope this was easy for you to follow
and please leave a link to show yours off to me if you try to make some :>

Saturday, July 24, 2010

ho ho ho hop hop hop

happy christmas in july!
after checking out nikkis awesome blog here are some ideas to get your creative mojo warming up for the christmas season.... only 154 days nad nights left to create to go! for this blog hop i decided to go with some decorations because my house is in a much needed re-vamp in the christmas decoration department. i am tired of the shop-bought-made-in-china stuff and have decided i need to start making my christmas decorating look more like me and be come a statement of who i am and what i love. so nothing like a blog hop to get me motivated! i made my santa in a sleigh after seeing many china ornaments doing the same thing and i thought to myself that would be easy to do in paper...surely? weeeeelllll.....yes it was..after some time and patience was added lol i ran my so swirly jumbo wheel over the sleigh template with some silver ink. then i added some swirls of pink super nova glitter and white chunky glitter to the edges the tree was made using garden green dsp and running it through an embossing folder on the big shot. then i inked it up with a variety of green inks to give it some depth. santa was done with punches and his beard was also embossed first before punching out with the small scallop oval punch and the heart punch for his mo. rudolph was made to stand up by inserting a triangular strip of clear acetate to it's stomach. he also has chunky white glitter all over his antlers (just in case the bright red glittery nose fails to help him see his way!!) next on my list was to make some christmas cubes. i have seen these done many ways with wooden cubes but being the cheapskate that i am i knew i could do them with card and a printable template from the internet now intially my plan was to get my cubes to stand on top of each other which would be fine... if i hadn't gotten a bit carried away with the dimensionals and sticky out bits lol so now they have to stand side by side i used raspberry tart paper which is not a traditional chrismas paper but it soooo pretty! the words i used were love hope star gift noel xmas each cube has a variety of raspberry tart dsp with matching circles and scallop circles punched out and added to them i tried to make them as varied as possible on this cube i used silver twine (now retired sob sob) with our flower fusion felt flowers (wow that is a tongue twister to say!) i also added some dazzling diamonds to the silver brads and flowers on this cube i used rub ons and stuck dazzling diamonds on the scallops this cube was just glitter! i tried to o a different glitter pattern on each face (and yes there was glitter for africa in my study rofl) this cube also had a ribbon around it (not that i have actually photographed the side you cna see it on) and i added dazzling diamonds to the edges. the letters on the cubes were done in silver embossing powder hope you like these cubes and ahve enjoyed the esad blog hop
What is ESAD?

ESAD stands for Extra Special Australasian Demonstrators and it is an online group just for Australian and New Zealand demonstrators for Stampin’ Up!

We so love what we do and not only do we love to share it with our customers, friends, and wonderful blog visitors but we share our love for what we do with each other as Demonstrators. We run swaps, challenges, tutorials, product know how and cyberstamps and we are always there to help and support each other when its needed.

So if you are a Stampin’ Up! Demonstrator located in Australia or New Zealand then please feel free to click here to join our wonderful group.

pop on over to leonie's blog now for some of her beautiful ideas

cheers ears!

sunny days are here again!

it is a brisk winter morning here in sydney and what a better way than to start the day by snuggling into my ugg boots, sitting in my pj's, and playing on the puter! although my snuggliness will be short lived as my kids need to go to soccer this morning-urg! a while ago i was busy making scrapbooking pages with our sunny days scrappin kit and i found this lovely idea from leanne graf and i thought "oooooooooooo" as one does!
here is my take on her fabulous idea.
it is an accordian album-like a zigzag album a bit i suppose. i have put a cover all around it
see it spread out i managed to make 8 pages with mine
i used the dsp from the sunny days pack for my background and just added the various sticker elements from the pack.
here is a close up of a page with my grinning little monkey! i am doing classes with accordian albums check out my classes page at the top it would be great to see you! cheers ears

Monday, June 21, 2010

2-step bird punch..ooo and blog candy!

did i mention how cool this punch is? WAAAAAAAAAAAY COOL!
this card was made with a small 3d frame i also used plenty of detail on the bird's body and leaves some crystal effects and dazzling diamonds for stars and some yummy choc chip ribbon that's all folks from me however if you have found a way of using the bird punch differently i would love to know how send your ideas in to me by the end of the month and be in to win some blog candy aka cool stampin up stuff for free! offer is open to other su demos :> cheers ears

Thursday, June 17, 2010

noah's ark

i was invited to attend a baptism on the weekend of two good friends' children. not being very 'goddy' myself i was not comfortable doing anything with too many religious symbols etc so i thought about bible stories instead and came up with noah and his ark
so i made two little noah's arks with co-ordinating cards. i found the template for the ark card here and followed that to make a 3-d version. i also found these which i just have to share with you noah's ark cake noah's ark burger and let us not forget a real life real scale replica! oh my!
anyways back to what i did :>
on one side of the ark i added some chipboard letters and waves and the cute little whale from fox and friends and a photo of the recipient munchkin in the top window
on the other side of the ark i used the animal images from fox and friends in the windows and added waves using some of my stash paper
here is the top of the ark showing where i have cut a slit in the top so it can be used as a money box i actually stuck a flap onto the house bit so it can be raised up and down
down below are the templates and mesurements of the various bits if you want to use my idea. please say hi and post up a link so i can see what you have done :>
this bit is the bottom that goes under the ark. it may need a bit of trimming on the edges but it is a 29cm (approx) by 8cm peice of card. this bit is the floor of the ark-it goes on top of the base but is the floor for the little house bit...did that make sense? it is a 16cm by 8cm peice with a 2cm edge to it so it is really a 20cm x 12cm sheet lol but you have to fold in and score at 1 cm if that makes sense when finishing it offand attaching it to the hull i stuck a centimetre strip of matching card stock all the way around to strengthen it and tidy it up i'm not very good at instructions am i? lmao this peice is the little house bit on the top. it is27cm long and you will need to score at 4cm, 12cm, 16cm, 24cm the top of the triangle is 8cm and the rest is 4cm high (i didn't add that to the picture-oops!) this is the roof of the house. 13cm which includes 2x 1cm for flaps. i also added strips to the side of the roof to make it look prettier the sides where made using a 16cm x 81/2cm peice of card and then putting my dst roll along one side and using that to give it some curve. it was flexible enough for me to make it fit the curve i wanted lol i added tabs to it so it would stick easier to the bottom part. make sure you cut 2 of these out or your ark will sink faster than the titanic!!! okies hope this is useful and you make loads of these cheers ears