Showing posts with label buttons. Show all posts

Thursday, October 8, 2015

to a good friend...thinking of you

needed a card for a nana today 
and came up with this

 loads of layers and simple colours and flowers and butterflies
 simple design using some dsp on the background ad a little bit in the centre of the flowers

 i used an embossing folder for some texture on the background
added some boho blossoms, bird punch and circles for the flowers
large scallop circle die that i pierced some holes in
cute little button with matching yellow cotton
for a little bit of whimsy i added in some string and some matching beads 
not my normal kind of card
do you think i got my nana on enough?

Tuesday, September 29, 2015

thanks

i belong to a monthly swap
and this month we had a sketch to follow
we also had some "given" objects the leader of the swap 
had sent to us that we had to use on our cards.
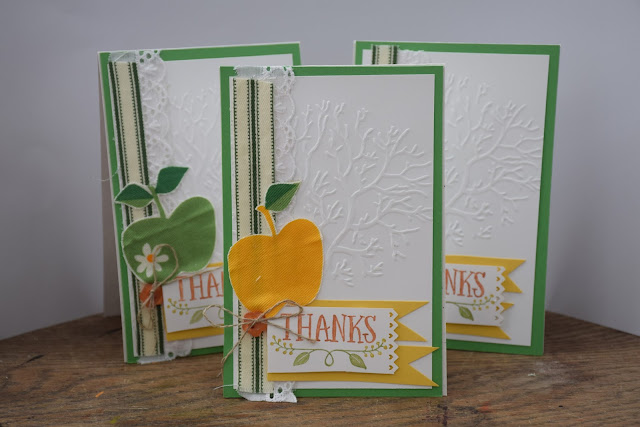
i got fabric-some with lines on it and some with apples.
here is my swap

 i used the stamped images from thankful forest friends in front of an embossed tree image
 the apple fabric i cut out the images and sued them whilst the striped material was used for a banner strip on the side with a bit of lace added to it.
i made an extra card with the leftover scraps and the other sentiment from the set.
i also added some buttons and twine this time.

Sunday, July 6, 2014

a frozen olaf

if you are a mother of little girls 
then you are like me 
and know all the words to "let it go" 
my kids (yes even the man-cub) 
have enjoyed frozen 
and love watching snippets of it on you tube
especially olaf
he is the best :)
 here is my ode to olaf.
i have done a shaker card 
with seed beads, snow flakes 
and sequins in the middle
 olaf is made using a variety of circles and ovals 
with the bird punch for his arms
 around the edges i have 
used some snowflake chain i had 
plus some buttons from my stash.
 the top i used some white ribbon with a heart charm and bakers twine 
and used an itty bitty banner framelit 
with a hand written sentiment 
(because i didn't have one small enough to fit in it that i liked lol)
 i embossed the window sheet 
with a snow flake design 
and used the leftovers as embellishments 
for the corners 
and added some pearls and diamantes to them
here's the shaker element of the card 
with an embossed cover and seed beads, 
sequins and snowflakes inside 
and in a large scallop circle shape

the idea for a shaker card was inspired by the challenge set by the just add ink girls 
and i figured it was quite a cool element 
to add to my olaf card

cheers ears

Friday, April 13, 2012

scrapbooking with 7 photos

when we were on holiday in adelaide at christmas time the kids' aunty kelly taught them how to make flower darts from dandelion heads. the kids had a complete blast!!!
my son was particularly pleased with this new skill and kept pinging me all holiday every time he found suitable ammunition

 got me some retired dsp and letter stamps from stampin up for this layout along with a great collection of different buttons from my stash. I also added a chipboard monkey i bought a while ago knowing at some stage with 4 kids i would need a monkey rofl
 here you can see that i have coloured the monkey in with su markers and put crystal effects all over him. I also used a variety of rhinestone brads and clear buttons with the layout.
finally a bit of hodgepodge hardware frame and cool denim ribbon to put a tiny bit of journalling in.

you know what i like about su? they always have the perfect colour to go with my scrapbooking photos and the paper matches the card stock-makes my poor little sleep deprived brain cope with all the matchy-matchiness that i like.

cheers ears

Tuesday, April 3, 2012

single page scrapbooking layout with multiple photos

over at just add ink this week is a challenge for multiple photos on a single page layout...quite tricky really because if you are anything like me anything more than 3 photos on a page and i start attempting a double page layout.

anyways here's my take on it..
actually this is my second take to be honest because i mis-read the guidelines and did a double hahahaha ooops!
 for this layout i used up some paper from my stash that had fairies alll over it. i added some ribbon and a whole heap of buttons
 i also cut out a fairy from the paper and added that as a embellishment.
i also have to share with you what i do when i am scrapbooking. i always cut out the back so none goes to waste-aren't i a shocker??
what sneaky things do you do?

cheers ears

Friday, March 2, 2012

happy birthday

my big brother turned 50 this year so i made him a photo album with some of his childhood photos
i used a kaisercraft album from connies
-a local scrapbook shop with great customer service
and decorated it using the fab new designer series papers from 
sale-a-bration from stampin up called everyday enchantment


i used the tags die to make journalling tags
and added buttons for embellishments(see the very cool large buttons!!)
i have punched out photo corners
and used the pretty su in-colours ribbon
and added some bling-not too much because this album is for a man :>

cheers ears

Friday, August 6, 2010

choo choo...a first birthday gift coming through!

our little friend dante had his first birthday and i wanted to make him something a bit special i had a kaisercraft train hiding in my stash for a while now wanting me to transfor it so a first birthday present was a great idea for it
i have used a retired SU paper called jersey shore which i loved for its bright bold colours...
inside i have added loads of buttons and some chipboard
i made the train wheels using a combination of punched out circles and buttons. the edges of the train were drawn around with white gel pen after some black ink was sponged on to hide my dodgey trimming lol i have used a combination of stickers and punched out stars here as well.
on the back page i left spaces for his mum to fill in on some of dante's firsts if she can remember lmao!
cheers ears

Wednesday, April 28, 2010

hip hip and a hip hip hop off to the esad mother's day blog hop

hello peeps!!! welcome to my little slice of craftiness from sydney australia i hope you had fun at vicki's blog
what is esad you ask apart from some random word the cow has made up? esad is the extra special australian demonstrators (although they do let us kiwis in as well lol) and we all are stampin up demos in some form or another. we all love stampin up and doing cool stuff with the wonderful products we have available to us. We run swaps, challenges, tutorials, product know how and cyberstamps and we are always there to help and support each other when its needed. so if you reckon you would like to join us please check out the esad ning forum and say hi :> I challenged myself to use the very cute buttons #5 sizzlits die from the autumn/winter catalogue. retailing at only $9.95 this is a great addition to your stash as it delivers buttons at the exact colour you want rather than just making do. c'mon now i know if you are anything like me you often fumble through your stash of buttons trying to find the perfect one. with this you don't have to....and best of all...you can customize them to make them individual...woohoo! you can put through double thickness of card stock to get twice as many buttons. you can make buttons out of anything your imagination (and big shot) lets you. paper, card, chipboard, oht are just a few of the things i have tried using plain whisper white (or any plain colour really lol) card can then let you decorate the buttons with stamps
one of my fellow esad-ers shirley mcavoy shared her great ideas for making the die cuts chunkier and more button-like by adding layers and crystal effects. the 2 yellow buttons have had 4 extra layers added and the red round one has had 6...personally the red one has turned out better imo anyways onto what i have made with my buttons here is a 3d shoe made from a template from here i added some bella rose and raspberry tart dsp to the melon mambo card. buttons are on the strap and front bit. you can use this rather than a gift box to put some tasty chocolates in for mum. i asked my daughter (6) what else i could make and she decided i could make her a bracelet as i have one of those button necklaces she admires although i am not sure how practical a gift that would be in the rain lol but you could easily adapt the idea for wine glass gadgets my next idea was for the sexy mama in us all. nothing like a bit of cleavage and a yellow polka dot bikini template can be found here next what all mums need to get is flowers and here is one great big blingy bouncey one with a big button in the middle of flower! and finally a manniquin with friendly words rolled onto it and buttons-paper, card, acetate and real (yes..gosh darn it...real ones!!)-added to it with diamnates and pearls oh and glitter!!!! :> hope you enjoyed and feel inspired now off to the lovely lisa to see her fabulous work. just in case you do get lost here is a list of our esad participants Sharelene Meyer www.magpiecreates.com Kelly Nelson www.Kellysstampinspot.wordpress.com Kim Badelt www.kimsstampingspot.blogspot.com Jan McAnulty www.cardcaperswithjan.wordpress.com Megan Mcdonald www.megan-finishingtouches.blogspot.com Narelle Hodges www.stampwithnarelle.blogspot.com Kristine Thompson www.inkspotcreations.com Kylie Swain www.kraftykylie.typepad.com/blossom_designs Rachel Jackson www.havefunstamping.blogspot.com Nicky Adamson www.nickyadamson.blogspot.com Kari Hughes www.karigail.wordpress.com Vicki Were www.stmpinvickistyle.blogspot.com Clare McLlhatton www.craftycowcreations.blogspot.com Lisa Bullock www.daffyscrapper.wordpress.com Wendy Todd www.stampwithwendy.com.au Jenny Humphreys www.stampinbytheseatofmypants.blogspot.com cheers ears Moo may represent an idea, but only the cow knows. Mason Cooley

Friday, April 9, 2010

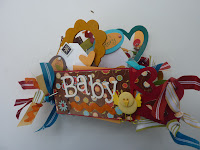
something for baby

a really good friend is about to have her baby and she doesn't know what flavour it is going to be so i have made this baby album for her i used a kaisercraft floral tags album as the base. i painted the chipboard with stampin up inks -tempting turquoise, real red, yoyo yellow and green galore iadded buttons with mini glue dots and added a heidiswap sticker thingie lol. i stuck the metal edge tags down as photo frames again used the metal edge tags and the felt flowers top view falling over on my side view lol front view check out the very cute button chicken i have hoarding in my stash for ages and finally found a use for it. i hope she likes it